Chapeau à créer
Radiotherapy: Graphite calorimetry, a basis of the traceability chain
Since medical exposure is by far the most common source of artificial irradiation, there is a clear need to provide specific metrological references in this field. Radiotherapy in particular requires precise control of the doses administered in "target" volumes (for tumours), which in turn depends on highly accurate characterization of the doses produced by radiation sources (accelerators, cobalt). To meet this need, metrologists must develop primary reference standards that represent as closely as possible the dose absorbed in biological environments, in irradiation conditions that are identical to those of human exposure. Reference standards are defined in environments close to biological tissue, for their properties of interaction with matter (similar atomic number): air, water, graphite, etc. Medical physicists thus characterize radiation beams in terms of absorbed dose to water.
Thorough knowledge of the characteristics of irradiation enables us to precisely determine its repercussions on human health, and consequently better control its use.
Introduction to ionizing radiation: sources, useful quantities and standards
Radiation is said to be ionizing when its energy is sufficient to eject an electron from the electron cloud of an atom or a molecule.
There are two categories of ionizing radiation:
- directly ionizing radiation, where charged particles such as electrons and protons interact directly with the electrons of the atomic layers, exciting or ionizing them
- indirectly ionizing radiation, which involves neutral particles, such as photons and neutrons. Ionization is produced only through interaction of the "primary" particle with the environment (Compton effect, photoelectric interaction, creation of pairs, etc.), which releases a "secondary" charged particle.
In France, artificial exposure accounts for a third of all exposure to ionizing radiation. Around 60 million examinations and 180,000 radiotherapy treatments are performed each year, and involve many radiation sources.
X-rays produced by generators are used for radiodiagnosis. Their energy varies widely, from around 30 kV in mammography or 50 kV in dental treatment to as much as 120 kV in standard diagnosis. For radiotherapy, particularly treatment of tumours, the most commonly used rays are provided by linear accelerators producing photons or electrons up to 30 MeV, sources of 60Co (cobalt therapy) or 192Ir (brachytherapy).
Whatever its source, ionizing radiation produces ionization in biological environments that causes radiolysis of the water they contain. The radicals produced alter the DNA and proteins of cells. The effects on tissues or organs vary, depending on the volume irradiated, the type and energy of the radiation, and the energy absorbed per unit of mass (called the absorbed dose).
The notion of absorbed dose is thus essential for medical applications, as this quantity corresponds to the amount of energy transmitted to tissues by the incident radiation. The "absorbed dose" metrological quantity D is expressed in grays. It equals the quantity of energy absorbed by the unit of mass:
\[D=\genfrac{}{}{1pt}{}{\text{d}E_{abs}}{\text{d}m}\]
The value of a given radiation depends on the environment in which it is measured.
As we have seen, the metrological quantity characterizing a radiation field depends on several factors, including the environment in which it is measured, and the nature and energy of the radiation considered. Metrological standards are therefore provided by reference measuring instruments, enabling us to measure the metrological quantity in the given environment in a specific radiation field – and by this radiation field – once it has been characterized.
The graphite calorimeter is one of these reference measuring instruments. It is one of the most accurate primary dosimeters and provides the most direct access to the absorbed dose quantity.
The energy imparted to the irradiated matter by the ionizing radiation is converted into heat, and it is the resulting temperature rise that is measured. If the energy imparted is converted almost entirely into heat, it is possible to obtain the required quantity, i.e. the absorbed dose.
Principle of calorimetric measurement
Calorimetry involves measuring the rise in temperature of an element of volume of this instrument when it is exposed to a radiation source. To do this, the corresponding quantity of heat must be exactly equal to the energy imparted to the element of volume by the ionizing radiation. There must be no heat exchange with the surrounding elements, or the exchange balance must be nil. Nor must there be any heat defect, i.e. all the energy transmitted by the radiation must be converted into heat. In certain environments ionizing radiation may cause chemical or physicochemical reactions producing or absorbing heat.
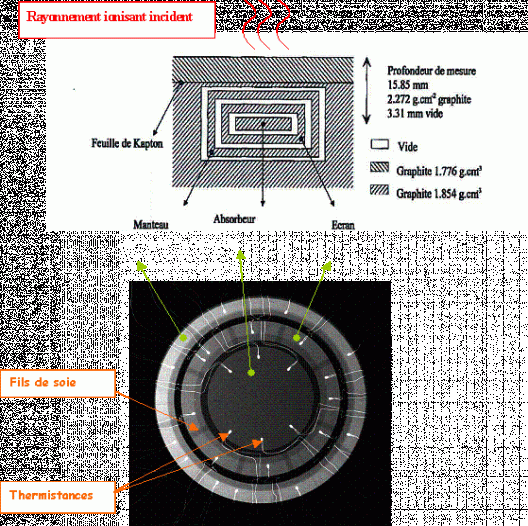
To meet these conditions a solid calorimeter is used. It consists of several concentric bodies – usually three: an inner core ("absorbeur"), a shield ("écran") and an outer jacket ("manteau") – which are inserted in a block of the same reference material. The calorimeter's design is shown below (figure 1, top), in a side-view diagram and in a top-view radiograph of the model (figure 1, bottom) undergoing validation at the Laboratoire National Henri Becquerel (LHNB).
The core is the sensitive part of the detector, where the temperature rise caused by irradiation is determined. Its exact mass must be known, so that the value of the mean absorbed dose in this component may be deduced from the energy imparted.
The nested assembly is held in place by silk threads ("fils de soie") which keep each part in suspension and ensure they do not come into direct contact. A vacuum of 10-3 Pa is maintained in the gaps by means of a pumping system. Each part is covered in aluminized mylar film.
These three precautions make it possible to minimize all phenomena of heat transfer (by conduction, convection and radiation) between the calorimeter's component parts and its outside environment, thus ensuring thermal insulation of the whole and of the core in particular.
The rise in temperature is measured with thermistors, whose resistance varies with temperature according to a specific law. A set of thermistors is inserted in each of the calorimeter's components. The thermistors have two uses: some measure temperature, others deliver heat through the Joule effect. Certain thermistors permanently monitor the difference in temperature between the calorimeter's different components. The heating thermistors are servo-controlled to supply the quantity of heat needed to keep the shield at the same temperature as the core – making heat exchange by radiation between these two bodies insignificant – and to keep the jacket at a fixed temperature, a few degrees higher than the ambient temperature in the laboratory. The jacket acts as insulation against the environment.
Graphite was chosen as the calorimeter material for three of its intrinsic properties. Firstly, it presents no heat defect for the radiation (photons, electrons) and energy (up to around 50 MeV) concerned. Secondly, its atomic number represents an environment that is close to biological tissues. Thirdly, its mechanical qualities are such that precision machining is possible and its geometrical characteristics are not affected by irradiation.
Temperature measurements are made using a Wheatstone bridge with four arms. One arm consists of the measurement thermistor and the other three consist of resistances, two known and one variable. The variation in temperature, producing a variation in resistance, is quantified by measuring the imbalance voltage. This is the bridge reading L. The proportionality between the temperature variation DT and the reading L can thus be established:
\[\Delta T =A\times L\]
where A is the coefficient of proportionality.
The dose absorbed in graphite (Dg) is given by the following relation:
\[D_{g}=\genfrac{}{}{1pt}{}{Q}{m}\times \genfrac{}{}{1pt}{}{1}{r_{cal}}\times\prod_i k_{i}\]
where :
- Q is the heat produced under irradiation; it is equal to $C\times \Delta T$, where C is the heat capacity of the core
- rcal is the heat efficiency (equal to 1 for graphite, which has no heat defect)
- ki are the dose correction factors.
In practice, there is no need to establish the heat capacity of the core C and the temperature rise ∆T through electrical calibration of the device. It is calibrated by dissipating a quantity of heat Qét in the heat thermistors (by Joule effect) and measuring the corresponding bridge reading Lét. This gives:
\[D_{g}=\genfrac{}{}{1pt}{}{F\times L}{m}\times\genfrac{}{}{1pt}{}{1}{r_{cal}}\times\prod_i k_{i}\]
where F is the electrical calibration coefficient (Qét / Lét).
By way of example, an absorbed dose of 1 Gy corresponds to a temperature rise in the region of 10-3 K, resulting in a resistance imbalance across the Wheatstone bridge of 0.3 Ω. We can thus see that the main limitation of this technique is its low sensitivity, around 1 mK/Gy.
The correction factors ki take into account disturbance produced by:
- non-graphite components, i.e. the vacuum gaps and "impurities" present in the core (thermistors, glue, thread, etc.)
- dose gradient effects in the core
- differences in heat leakage between calibration and measurement
- geometrical deviation (alignment of the calorimeter with respect to the incident radiation axis), etc.
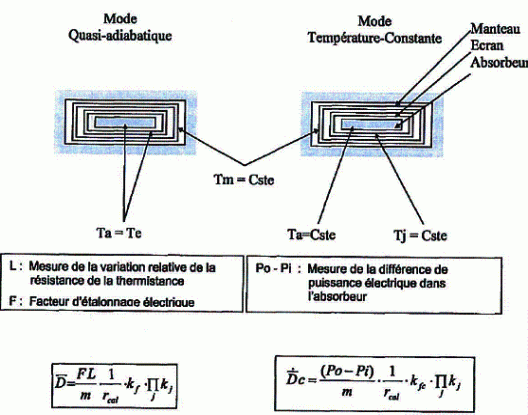
In order to ensure accurate measurements, the heat insulation must be perfect and the system must operate adiabatically. It is difficult to control heat exchange between the measurement system and its environment, but the problem is overcome by working in two operating modes that approach ideal conditions: quasi-adiabatic mode ("mode quasi-adiabatique") and constant-temperature mode ("mode température-constante").
The quasi-adiabatic mode is based on thermal feedback between the core and the shield. When a temperature difference between these two elements is detected, the PID (proportional-integral-derivative) controller sends an electrical charge to the shield to reduce the difference.
In this operating mode, the temperature of the calorimeter increases continuously throughout irradiation. When the measurements are completed, thermal feedback is halted and the elements return to their equilibrium temperature. The return to equilibrium is slow, however, on account of the calorimeter's heat insulation.
The second operating mode – constant-temperature mode – has been developed over the last few years at LNHB.
The principle consists in keeping the core, shield and jacket at fixed temperatures with highly accurate heat controllers. To maintain this equilibrium, the energy dissipated in each element must be constant. Without irradiation, the energy is dissipated only by the Joule effect. Under irradiation, the electrical energy is only the complement of the energy imparted by irradiation. The value of the dose rate to be measured in the core is therefore proportional to the difference in the electrical power supplied to it without irradiation (P0) and during irradiation (Pi). A comparative measurement campaign has been carried out at LNHB with a cobalt-60 gamma photon beam. The results are consistent and show a deviation of only 0.04%. The Type A reading uncertainty in constant-temperature mode (0.03%) is significantly lower than in quasi-adiabatic mode (0.06%).
Controlling medical exposure
The traceability chains defined by French accreditation body COFRAC (formed in 1994) meet a need for rationalization and reliability in the testing and calibration field. They control the transfer of a reference standard from its creation in the national metrology laboratory to end users, via accredited calibration laboratories. The International Weights and Measures Bureau (BIPM) runs regular comparisons of national references to ensure their consistency at international level.
The Laboratoire National Henri Becquerel (LNHB) is France's national metrology laboratory for ionizing radiation. It is the guarantor of three derived units of the international SI system: the gray (Gy), the sievert (Sv) and the becquerel (Bq). The first two, which concern dosimetry, correspond to energy divided by mass, or joules per kilogram (J.kg-1), and are therefore derived from the base units of mass, length and time. The traceability chain for ionizing radiation for medical applications is very short. This is partly due to the small number of accredited calibration laboratories, but also to the low variance between the accuracy of the metrological references (around 1%) and the accuracy required for radiotherapy applications (better than 5% for the dose delivered to a tumour). A direct link to the national laboratory minimizes the uncertainty attached to calibration. LNHB performs the twofold task of developing reference standards and transferring them to users. This is the case for radiotherapy in particular, where LNHB calibrates the reference dosimeters used by radiotherapy departments to characterize their radiation beams.
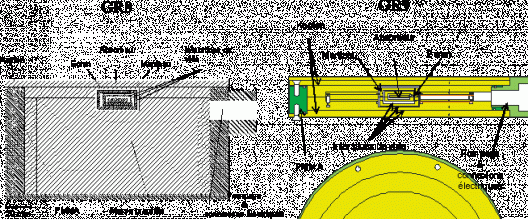
At present, the French primary reference instrument for absorbed dose to graphite is the GR8 calorimeter, used with a cobalt-60 beam in precise geometrical conditions. A second calorimeter, called GR9, was developed in 2007 and is currently undergoing validation. It should provide a lower uncertainty level and will replace the GR8 in the primary instrumentation chain. It has already been tested in the two standard operating modes in a cobalt-60 beam. Following validation of these results, the GR9 should be usable in standard mode by the end of 2008.
The GR8 and GR9 calorimeters are shown in figure 3. The core is a solid graphite cylinder, 16 mm in diameter and 3 mm thick. The shield and jacket, which are symmetrical in relation to the planar axis, are each 2 mm thick. The three elements are thermally insulated from each other. The vacuum gaps ("interstices de vide) between each element are 1 mm thick. The graphite element is vacuum pumped ("pompage") and insulated by Kapton and PMMA film.
To perform dosimeter calibration, the reference calorimeter is inserted in a "dummy" graphite parallelepiped. Cylinders of the same material may be inserted between the calorimeter and the incident beam in order to adjust the depth of measurement.
The combined standard uncertainty on Dg is 0.24% for cobalt-60 photons. Its main components stem from the electrical calibration coefficient (0.05%), the calorimeter's mechanical design (heat insulation, thermistor, 0.19%), and the physical data rcal (0.1%).
The dose absorbed to water is determined from the dose absorbed to graphite by performing comparative graphite-water transfer experiments with ionization chambers and/or Fricke chemical dosimeters.
Characterization of exposure to ionizing radiation involves measurement and calculation of the dose absorbed in the biological environment. This in turn involves intermediate environments and numerous corrective factors.
Maintaining national standards and providing users with access to them is one of LNHB's key roles. As such, and in the context of its COFRAC accreditation, the laboratory ensures traceability for accredited calibration laboratories and performs calibration in medical and radiological protection fields. The services provided include:
- calibration of dosimeters in a radiotherapy beam of 60Co gamma photons, in terms of dose absorbed to water or kerma in the air
- calibration of dosimeters in high-energy X-ray beams (Saturne 43F linear accelerator), in terms of dose absorbed to water
- combined calibration of dosimeters in high-energy X-ray beams (Saturne 43F linear accelerator) and 60Co gamma photon beams, in terms of dose absorbed to water
- calibration of dosimeters in high-energy electron beams (Saturne 43 linear accelerator), in terms of dose absorbed to water
- combined calibration of dosimeters in high-energy electron beams (Saturne 43 linear accelerator) and 60Co gamma photon beams, in terms of dose absorbed to water
- calibration of personal dosimeters and area dosimeters for radiological protection in 60Co and 137Cs gamma photon beams and beta radiation beams emitted by 90Sr-90Y, 85Kr and 147Pm sources, in terms of equivalent dose (ambient or directional, and personal)
- irradiation of passive dosimeters at given doses in all photon and beta radiation beams.
Further reading
J. BARTHE, B. CHAUVENET and J.-M. BORDY, “La métrologie de la dose au CEA: le Laboratoire National Henri Becquerel“, Radioprotection, 41, n° 5, 2006, S9-S24.
J.-M. BORDY, “References métrologiques en dosimétrie, possibilités d’étalonnages offertes aux utilisateurs, analyse des priorités et problématique de réduction des incertitudes“, Enseignement post-universitaire - CHU Henri Mondor, 2006.
J. DAURES and A. OSTROWSKY, “New constant-temperature operating mode for graphite calorimeter at LNE-LNHB”, Phys. Med. Biol., 50, 2005, 4035-4052.
J. DAURES and A. OSTROWSKY, “Test of the new GR9 graphite calorimeter. Comparison with GR8”, Workshop on absorbed dose and kerma in air, 2007.
J. CHAVAUDRA, B. CHAUVENET and A. WAMBERSIE, “Medicine and ionizing radiation: metrology requirements”, C. R. Physique, 5, 2004, 921-931.
J. M. BORDY, “Réalisation de prestations d’étalonnage“, www-carmin.cea.fr/content/download/476/3362/version/6/file/lnhb_etalonnage.pdf
J. DAURES, A. OSTROWSKY and B. CHAUVENET, “Mesure de la dose absorbée de reference dans le graphite, à l’aide du calorimètre graphite GR8 sous le faisceau de Cobalt 60 n°2B”, Rapport technique, 3, 1995.
D. BLANC, “Les rayonnements ionisants : détection, spectrométrie, dosimétrie”, Editions Masson – Physique fondamentale et appliquée, 1990.


